Wow! Please! Do it again!: 2013

Saturday, August 31, 2013

SGS2: Flash CM10.2 20130831 Nightly Build

Steps:
1. Downloaded cm-10.2-20130831-NIGHTLY-i9100.zip and copied to internal SD. Verified MD5 checksum (57c8450efbd3cf145dfb751c595fbd9c).
2. Downloaded gapps-jb-20130813-signed.zip and copied to internal SD. Verified MD5 checksum (1f51b5cc6370c1f45dc951109b6ce6ed).
3. Reboot into CWM Recovery.
4. Created backup.
5. Flashed cm-10.2-20130831-NIGHTLY-i9100.zip
6. Flashed gapps-jb-20130813-signed.zip
7. wipe cache partition.
8. advanced > Wipe Dalvik Cache.
9. Reboot.


Monday, July 15, 2013

SGS2: Flash CM10.1 20130715 Nightly Build

There was an issue with GPS (not being able to fix on location) in the previous builds. Fixed in this build

galaxys2: gps: add magic field to AGpsRefLocationCellID struct (android_device_samsung_galaxys2-common)

Steps:
1. Downloaded cm-10.1-20130715-NIGHTLY-i9100.zip and copied to internal SD. Verified MD5 checksum (3962f7ae61eee11954dc39016f68fa71).
2. Reboot into CWM Recovery.
3. Created backup.
4. Flashed cm-10.1-20130715-NIGHTLY-i9100.zip
5. wipe cache partition.
6. advanced > Wipe Dalvik Cache.
7. Reboot.

Saturday, July 13, 2013

SGS2: Flash CM10.1 20130712 Nightly Build

Steps:
1. Downloaded cm-10.1-20130712-NIGHTLY-i9100.zip and copied to internal SD. Verified MD5 checksum (f22fd28cdc6f2f54ad583fb19d748b5b).
2. Reboot into CWM Recovery.
3. Created backup.
4. Flashed cm-10.1-20130712-NIGHTLY-i9100.zip
5. wipe cache partition.
6. advanced > Wipe Dalvik Cache.
7. Reboot.


Friday, July 5, 2013

SGS2: Flash CM10.1 20130705 Nightly Build

Steps:
1. Downloaded cm-10.1-20130705-NIGHTLY-i9100.zip and copied to internal SD. Verified MD5 checksum (82fe5f63e00081b7d5066efbc581dfa8).
2. Reboot into CWM Recovery.
3. Created backup.
4. Flashed cm-10.1-20130705-NIGHTLY-i9100.zip
5. wipe cache partition.
6. advanced > Wipe Dalvik Cache.
7. Reboot.


Saturday, June 29, 2013

SGS2: Flash CM10.1 20130628 Nightly Build

Steps:
1. Downloaded cm-10.1-20130628-NIGHTLY-i9100.zip and copied to internal SD. Verified MD5 checksum (0e9be15bc66dd56dddba1752ccd9511d).
2. Reboot into CWM Recovery.
3. Created backup.
4. Flashed cm-10.1-20130628-NIGHTLY-i9100.zip
5. wipe cache partition.
6. advanced > Wipe Dalvik Cache.
7. Reboot.


Friday, June 14, 2013

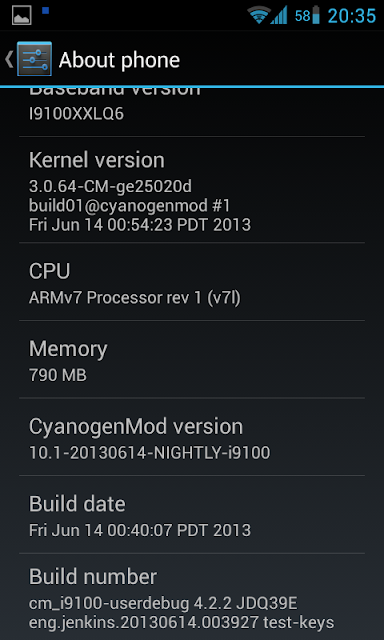
SGS2: Flash CM10.1 20130614 Nightly Build

Steps:
1. Downloaded cm-10.1-20130614-NIGHTLY-i9100.zip and copied to internal SD. Verified MD5 checksum (cd205d62e52055d7bd9b267244aeb36a).
2. Reboot into CWM Recovery.
3. Created backup.
4. Flashed cm-10.1-20130614-NIGHTLY-i9100.zip
5. wipe cache partition.
6. advanced > Wipe Dalvik Cache.
7. Reboot.

CABC - Enable content adaptive backlight control

Vibrator

Vibration strength


Saturday, June 1, 2013

SGS2: Flash CM10.1 20130601 Nightly Build

Steps:
1. Downloaded cm-10.1-20130601-NIGHTLY-i9100.zip and copied to internal SD. Verified MD5 checksum (cd205d62e52055d7bd9b267244aeb36a).
2. Reboot into CWM Recovery.
3. Created backup.
4. Flashed cm-10.1-20130601-NIGHTLY-i9100.zip
5. wipe cache partition.
6. advanced > Wipe Dalvik Cache.
7. Reboot.

Screen looked weird after flashing (distorted icons and fonts). Not reflected in screenshots. Found this setting under Settings > Advanced > Screen (tab) > Scenario > Video Cold. Set it back to "CyanogenMod (Default)" and everything looks normal again. phew...


Sunday, May 19, 2013

SGS2: Flash CM10.1 20130519 Nightly Build


Steps:
1. Downloaded cm-10.1-20130519-NIGHTLY-i9100.zip and copied to internal SD. Verified MD5 checksum (25ad96a7d9fa21b1af9854ae18812896).
2. Reboot into CWM Recovery.
3. Created backup.
4. Flashed cm-10.1-20130519-NIGHTLY-i9100.zip
5. wipe cache partition.
6. advanced > Wipe Dalvik Cache.
7. Reboot.

Monday, May 13, 2013

SGS2: Flash CM10.1 20130513 Nightly Build


Steps:
1. Downloaded cm-10.1-20130513-NIGHTLY-i9100.zip and copied to internal SD. Verified MD5 checksum (8c203831c028832481f7866233c58a40).
2. Reboot into CWM Recovery.
3. Created backup.
4. Flashed cm-10.1-20130513-NIGHTLY-i9100.zip
5. wipe cache partition.
6. advanced > Wipe Dalvik Cache.
7. Reboot.

Wednesday, May 1, 2013

Nexus 7: Flash CM10.1 20130501 Nightly Build


Steps:
1. Downloaded cm-10.1-20130501-NIGHTLY-grouper.zip and copied to internal SD. Verified MD5 checksum (d59189f11c3e82be6f8d396b6f284879).
2. Reboot into Recovery (TWRP).
3. Created backup.
4. Flashed cm-10.1-20130501-NIGHTLY-grouper.zip
6. Wipe cache partition + Dalvik Cache.
7. Reboot.

SGS2: Flash CM10.1 20130501 Nightly Build


Steps:
1. Downloaded cm-10.1-20130501-NIGHTLY-i9100.zip and copied to internal SD. Verified MD5 checksum (3120054288518e6b10387a805748e261).
2. Reboot into CWM Recovery.
3. Created backup.
4. Flashed cm-10.1-20130501-NIGHTLY-i9100.zip
5. wipe cache partition.
6. advanced > Wipe Dalvik Cache.
7. Reboot.

Friday, April 26, 2013

SGS2: Flash CM10.1 20130426 Nightly Build


Steps:
1. Downloaded cm-10.1-20130426-NIGHTLY-i9100.zip and copied to internal SD. Verified MD5 checksum (9f62e5804c42acf46f43130132c5d6e2).
2. Reboot into CWM Recovery.
3. Created backup.
4. Flashed cm-10.1-20130426-NIGHTLY-i9100.zip
5. wipe cache partition.
6. advanced > Wipe Dalvik Cache.
7. Reboot.


Settings > Sound

Saturday, April 20, 2013

SGS2: Flash CM10.1 20130419 Nightly Build


Steps:
1. Downloaded cm-10.1-20130419-NIGHTLY-i9100.zip and copied to internal SD. Verified MD5 checksum (a2ae2d393da086d95b21b78dacd90da2).
2. Reboot into CWM Recovery.
3. Created backup.
4. Flashed cm-10.1-20130419-NIGHTLY-i9100.zip
5. wipe cache partition.
6. advanced > Wipe Dalvik Cache.
7. Reboot.

Tuesday, April 16, 2013

SGS2: Flash CM10.1 20130416 Nightly Build

Steps:
1. Downloaded cm-10.1-20130416-NIGHTLY-i9100.zip and copied to internal SD. Verified MD5 checksum (51366d3d37afa3094d17245a01d3f1be).
2. Reboot into CWM Recovery.
3. Created backup.
4. Flashed cm-10.1-20130416-NIGHTLY-i9100.zip
5. wipe cache partition.
6. advanced > Wipe Dalvik Cache.
7. Reboot.

Sunday, April 14, 2013

SGS2: Flash CM10.1 20130414 Nightly Build

Steps:
1. Downloaded cm-10.1-20130414-NIGHTLY-i9100.zip and copied to internal SD. Verified MD5 checksum (7099761490ffc52bb194e3ca325f9f16).
2. Reboot into CWM Recovery.
3. Created backup.
4. Flashed cm-10.1-20130414-NIGHTLY-i9100.zip
5. wipe cache partition.
6. advanced > Wipe Dalvik Cache.
7. Reboot.


Saturday, April 13, 2013

Nexus 7: Flash CM10.1 20130413 Nightly Build

SGS2: Flash CM10.1 20130413 Nightly Build

Steps:
1. Downloaded cm-10.1-20130413-NIGHTLY-i9100.zip and copied to internal SD. Verified MD5 checksum (71272ab7c430d6e8c5a54406d591fe2e).
2. Reboot into CWM Recovery.
3. Created backup.
4. Flashed cm-10.1-20130413-NIGHTLY-i9100.zip
5. wipe cache partition.
6. advanced > Wipe Dalvik Cache.
7. Reboot.


Saturday, April 6, 2013

SGS2: Flash CM10.1 20130405 Nightly Build

Steps:
1. Downloaded cm-10.1-20130405-NIGHTLY-i9100.zip and copied to internal SD. Verified MD5 checksum (818b06c31e5ba32eb6ca1efbeec0ee3e).
2. Reboot into CWM Recovery.
3. Created backup.
4. Flashed cm-10.1-20130405-NIGHTLY-i9100.zip
5. wipe cache partition.
6. advanced > Wipe Dalvik Cache.
7. Reboot.


Thursday, April 4, 2013

SGS2: Flash CM10.1 20130404 Nightly Build

Steps:
1. Downloaded cm-10.1-20130404-NIGHTLY-i9100.zip and copied to internal SD. Verified MD5 checksum (49c500cfa46e80122f4365147ebde767).
2. Reboot into CWM Recovery.
3. Created backup.
4. Flashed cm-10.1-20130404-NIGHTLY-i9100.zip
5. wipe cache partition.
6. advanced > Wipe Dalvik Cache.
7. Reboot.

Wednesday, April 3, 2013

Nexus 7: Flash Trinity 7 Kernel

ROM: CM 10.1 20130327 Nightly Build

1. Download TS1700-GPUOC-4.2.2-ALPHA1.zip from http://www.derkernel.com/
2. Reboot to recovery (TWRP 2.4.4.0)
3. Create backup
4. Flashed TS1700-GPUOC-4.2.2-ALPHA1.zip
5. Reboot


Sunday, March 31, 2013

SGS2: Flash CM10.1 20130330 Nightly Build


Steps:
1. Downloaded cm-10.1-20130330-NIGHTLY-i9100.zip and copied to internal SD. Verified MD5 checksum (39b444063a8b27530a14eb694f80cfa2).
2. Reboot into CWM Recovery.
3. Created backup.
4. Flashed cm-10.1-20130330-NIGHTLY-i9100.zip
5. wipe cache partition.
6. advanced > Wipe Dalvik Cache.
7. Reboot.


Wednesday, March 27, 2013

Nexus 7: Flash CM10.1 20130327 Nightly Build


Time for some pie (with cream)

Steps:
1. Downloaded cm-10.1-20130327-NIGHTLY-grouper.zip and copied to internal SD. Verified MD5 checksum (2dae7fcdd17b8f6be5ff1f7eb0b5ee27).
2. Reboot into Recovery (TWRP).
3. Created backup.
4. Flashed cm-10.1-20130327-NIGHTLY-grouper.zip
6. Wipe cache partition + Dalvik Cache.
7. Reboot.


Saturday, March 23, 2013

SGS2: Flash CM10.1 20130323 Nightly Build

Had a SoD today.. bloody hell...

Steps:
1. Downloaded cm-10.1-20130323-NIGHTLY-i9100.zip and copied to internal SD. Verified MD5 checksum (76d28a8d093cc787336e8edda6bb97cc).
2. Reboot into CWM Recovery.
3. Created backup. (I forgot!!!!)
4. Flashed cm-10.1-20130323-NIGHTLY-i9100.zip
5. wipe cache partition.
6. advanced > Wipe Dalvik Cache.
7. Reboot.


Friday, March 22, 2013

Nexus 7: Flash CM10.1 20130321 Nightly Build

After running the "motley" kernel (default settings) for almost 2 weeks, concluded that performance is better compared to Stock CM10.1 (higher Antutu scores), but battery life ain't that great (about 5 hours of on screen time).

Tuesday, March 19, 2013

SGS2: Flash CM10.1 20130319 Nightly Build

Steps:
1. Downloaded cm-10.1-20130319-NIGHTLY-i9100.zip and copied to internal SD. Verified MD5 checksum (0feef8bcc50cf87a300bbc566ea2c550).
2. Reboot into CWM Recovery.
3. Created backup.
4. Flashed cm-10.1-20130319-NIGHTLY-i9100.zip
5. wipe cache partition.
6. advanced > Wipe Dalvik Cache.
7. Reboot.

What's different here? # Superuser


Sunday, March 17, 2013

SGS2: Flash CM10.1 20130317 Nightly Build


Steps:
1. Downloaded cm-10.1-20130317-NIGHTLY-i9100.zip and copied to internal SD. Verified MD5 checksum (10e752c7539e82a379cc361afc2712a7).
2. Reboot into CWM Recovery.
3. Created backup.
4. Flashed cm-10.1-20130317-NIGHTLY-i9100.zip
5. wipe cache partition.
6. advanced > Wipe Dalvik Cache.
7. Reboot.


Monday, March 11, 2013

Nexus 7: Flash CM10.1 20130311 Nightly Build + motley kernel #249

Found motley kernel here.

Steps:
1. Flashed CM10.1 20130311
2. Reboot.
3. Flashed motley_anykernel_N7_build_249.zip
4. Reboot.

CM kernel

motley kernel

Thursday, March 7, 2013

SGS2: Flash CM10.1 20130307 Nightly Build and gapps 20130301


Steps:
1. Downloaded cm-10.1-20130307-NIGHTLY-i9100.zip and copied to internal SD. Verified MD5 checksum (dd7b9058bfd0bd6dddd74d5632509147).
2. Downloaded gapps-jb-20130301-signed.zip and copied to internal SD. Verified MD5 checksum (b7e53e96e1c8b1a1c4865bf29418c8e0).
3. Reboot into CWM Recovery.
4. Created backup.
5. Flashed cm-10.1-20130307-NIGHTLY-i9100.zip
6. Flashed gapps-jb-20130301-signed.zip
7. wipe cache partition.
8. advanced > Wipe Dalvik Cache.
9. Reboot.

790 MB now?


All apps that required root access must be granted again

Something is new under System... # Superuser !

Got audit?

SGS2 + CM10.1: How to solve WhatsApp freezing issue

I have had just about enough freezes while scrolling in WhatsApp, until I searched for "whatsapp" in this XDA thread.

Firstly, I tried the "Clear Data" way. Did a backup in WhatsApp (Settings > Chat settings > Backup conversations) and also in Titanium Backup. Then went into Settings > Apps > WhatsApp > Clear data. Restarted WhatsApp but didn't felt any smoother.

Next, enabled the Force GPU rendering option under Developer options. Scrolling in WhatsApp did felt smoother than before. I toggled a couple of times to compare. Yes, it is smoother.


But that wasn't enough for me, I checked on http://www.whatsapp.com/android/ that the version is 2.9.2871, while mine was still running 2.9.1547. Attempting to download it from the website on my phone would just load Play Store, so I downloaded it on my PC and copied it to the phone and installed it. Then only, I knew what Holo theme meant :P It's smooth without enabling the Force GPU rendering option.

Before

 After